
Learning how to make a robot with 3d printer is one of the most powerful modern skills for students, hobbyists, and future engineers. It combines creativity, engineering, electronics, and coding into one hands-on experience. In the past, robotics was expensive and limited to universities and big companies. Today, with low-cost 3D printers and open-source electronics, anyone can build real working robots at home.
This guide is designed for beginners in the United States and worldwide who want a clear, practical, and step-by-step roadmap. You do not need advanced engineering knowledge. You only need patience, curiosity, and willingness to learn.
By the end of this guide, you will understand:
- How to design robot parts using CAD software
- How to 3D print robot components correctly
- How to assemble motors and electronics
- How to program your robot step by step
- How to troubleshoot common problems
- How to move from beginner to advanced robotics
This is not just theory. This is a complete practical roadmap to building real robots.
What Does It Mean to Make a Robot with a 3D Printer
A robot is a machine that can perform tasks automatically or semi-automatically. When you use a 3D printer, you are essentially building the physical body of the robot yourself.
Instead of buying expensive industrial parts, you:
- Design robot parts on a computer
- Print them using plastic filament
- Add motors, sensors, and controllers
- Program behavior using code
This method is called DIY robotics or open-source robotics.
Most beginners start with projects like:
- Small robot cars
- Robotic arms
- Obstacle-avoiding robots
- Smart AI-based robots
- Humanoid prototype models
Learning how to make a robot with a 3d printer is also a gateway into careers in engineering, automation, AI, and manufacturing.
Also read:How to Make a 3D Printed Robot: Complete Beginner-to-Advanced Guide for 2026
Why 3D Printing is Revolutionizing Robotics
3D printing has changed robotics forever. Before this technology, robot building required machining, welding, and expensive factories. Now, anyone with a desktop printer can build advanced mechanical systems.
1. Extremely Low Cost Manufacturing
Traditional robot parts cost hundreds or thousands of dollars. With 3D printing:
- Plastic parts cost only a few dollars
- Failed parts can be reprinted cheaply
- No factory is required
2. Unlimited Customization
You can design anything:
- Custom robot arms
- Unique wheel systems
- Special sensor mounts
- Lightweight frames
No store-bought kit gives this flexibility.
3. Fast Prototyping
If your design fails:
- Modify it on computer
- Print again in a few hours
This speeds up learning massively.
4. Real Engineering Skills
You naturally learn:
- Mechanical design
- Electronics wiring
- Programming logic
- Problem solving
This makes robotics a powerful STEM learning tool.
Essential Tools and Materials You Need
Before starting your robot journey, you need basic tools in four categories.
3D Printing Equipment
- FDM 3D printer (Creality, Prusa, Anycubic)
- PLA filament (easy for beginners)
- PETG filament (stronger parts)
- Slicing software like Cura or PrusaSlicer
Design Software (CAD Tools)
- Tinkercad (beginner friendly)
- Fusion 360 (professional level)
- Blender (advanced shapes and models)
Electronics Components
- Arduino Uno or Mega
- Raspberry Pi (for smart robots)
- Servo motors
- DC motors
- Motor driver modules (L298N, L9110)
- Sensors (ultrasonic, IR, gyro)
Power and Assembly Tools
- Rechargeable battery packs
- Screwdrivers
- Hot glue gun
- Soldering iron
- Electrical wires
Having the right tools makes how to make a robot with 3d printer much easier and more efficient.
Understanding Robot Structure Before Building
A robot is not just one system. It is a combination of three systems working together.
1. Mechanical System
This is the physical structure:
- Frame
- Wheels or legs
- Joints
- Arms
2. Electrical System
This includes:
- Motors
- Sensors
- Battery
- Wiring
3. Control System
This is the brain:
- Microcontroller (Arduino or Raspberry Pi)
- Software code
- Decision-making logic
A successful robot requires all three systems working in balance.
Also read:3D Printed Robot Arm: Complete Guide to Design, Build, Uses, and Future Trends
Step-by-Step Guide: How to Make a Robot with 3D Printer
Now we go into the complete practical process.
Step 1: Choose Your Robot Type
Start simple. Do not jump into advanced humanoid robots.
Beginner options:
- Wheeled robot (best starting point)
- Obstacle avoidance robot
- Small robotic arm
Intermediate:
- Robotic arm with multiple joints
- Line-following robot
Advanced:
- Humanoid robot
- AI vision robot
Choosing correctly makes learning easier.
Step 2: Design Robot Parts in CAD Software
This is where your robot begins digitally.
You design:
- Base frame
- Motor mounts
- Wheel holders
- Sensor brackets
Design Tips
- Keep shapes simple
- Avoid thin fragile walls
- Use modular design
- Leave space for wiring
Beginners should start with Tinkercad because it is easy and browser-based.
Step 3: Convert Design to STL File
Once design is complete:
- Export as STL file
- Import into slicing software
The slicer controls:
- Layer height
- Print speed
- Infill strength
- Support structure
This step is very important for print quality.
Step 4: 3D Printing Robot Parts
Now your design becomes real.
Recommended Settings
- Layer height: 0.2 mm
- Infill: 20%–40%
- Material: PLA
- Print speed: 50–60 mm/s
After printing:
- Remove supports carefully
- Sand rough edges
- Test part fitting
Step 5: Assemble Robot Frame
Now build physical structure:
- Attach motors into mounts
- Fix wheels or joints
- Tighten screws properly
- Ensure balance
A strong frame is essential for robot stability.
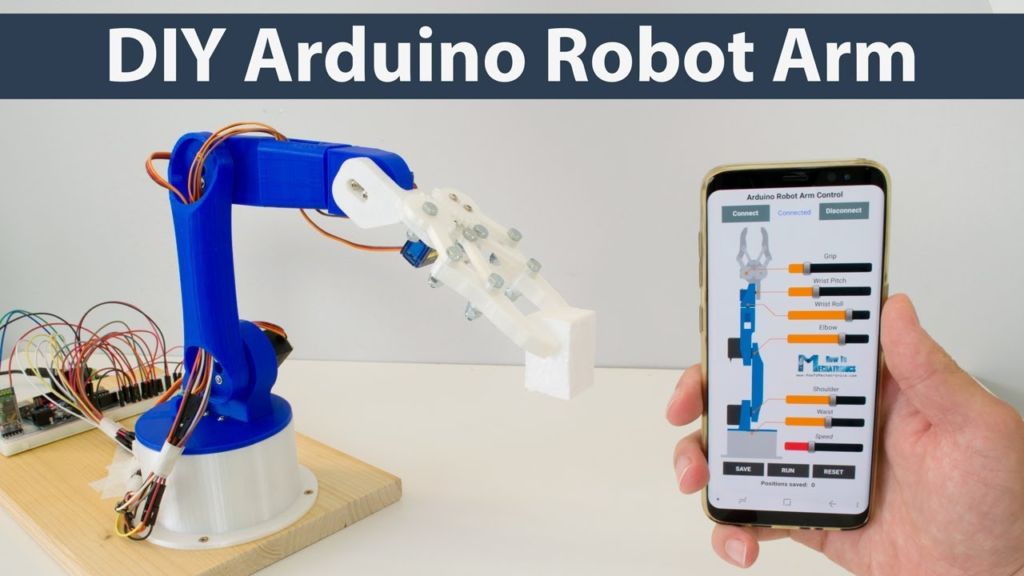
Step 6: Install Electronics System
This is the brain connection phase.
Example setup:
- Arduino Uno = brain
- Motor driver = movement control
- DC motors = wheels
- Ultrasonic sensor = obstacle detection
Important Tip
Keep wiring organized. Poor wiring causes most failures.
Step 7: Power System Setup
Power is critical.
- Use correct voltage battery
- Avoid overloading circuits
- Secure battery inside frame
- Use switch for safety
Step 8: Programming the Robot
Now your robot becomes alive.
Using Arduino IDE, you write simple logic.
Example behavior:
- Move forward
- Stop if obstacle detected
- Turn left or right
Simple Logic Example
If distance < 20 cm → stop → turn
This is the foundation of robotics intelligence.
Step 9: Testing and Debugging
Testing is where real learning happens.
Check:
- Do motors respond correctly?
- Are sensors accurate?
- Is code stable?
- Are parts secure?
Fix small errors step by step.
Arduino Code Example (Basic Robot Logic)
int motor1 = 9;
int motor2 = 10;
int sensor = 7;
void setup() {
pinMode(motor1, OUTPUT);
pinMode(motor2, OUTPUT);
pinMode(sensor, INPUT);
}
void loop() {
if (digitalRead(sensor) == LOW) {
digitalWrite(motor1, HIGH);
digitalWrite(motor2, HIGH);
} else {
digitalWrite(motor1, LOW);
digitalWrite(motor2, LOW);
}
}
This is a simple obstacle avoidance concept.
Types of Robots You Can Build with 3D Printer
1. Wheeled Robots
Best for beginners. Easy to build and program.
Also read:Is Stick Fight the Game Cross Platform? Complete 2026 Guide for All Platforms
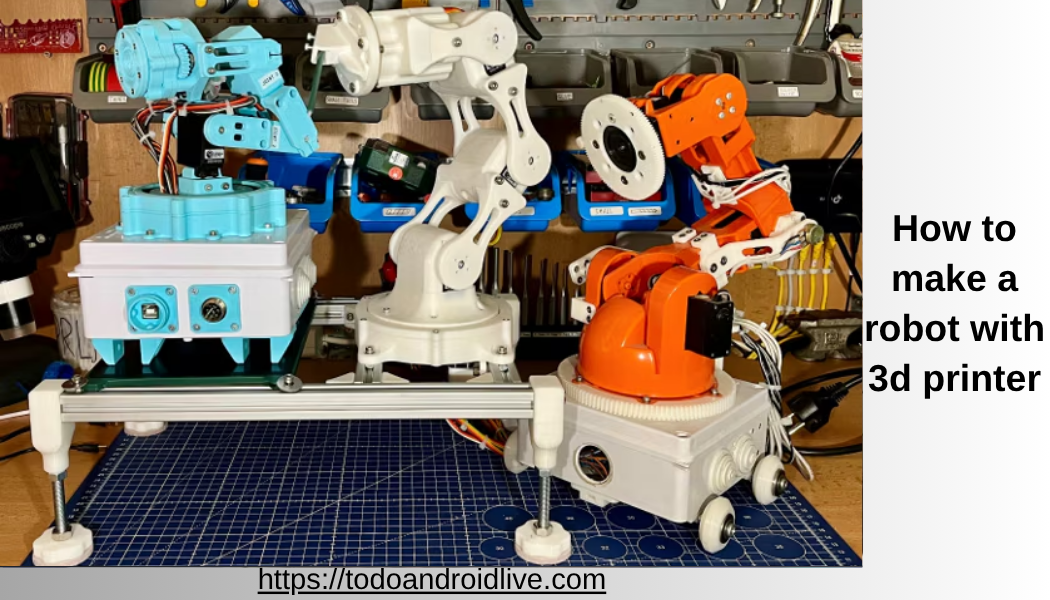
2. Robotic Arms
Used in factories and automation learning.
3. Humanoid Robots
Advanced robots that mimic human movement.
4. AI Robots
Uses Raspberry Pi, camera modules, and machine learning.
Advanced Robotics Ideas
Once you understand how to make a robot with a 3d printer, you can upgrade your projects.
Advanced features:
- AI object detection
- Voice control systems
- Bluetooth remote control
- Wi-Fi IoT control
- Machine learning behavior
These features turn simple robots into smart machines.
Common Beginner Mistakes
Avoid these mistakes:
- Starting with complex designs
- Wrong motor selection
- Weak 3D printed parts
- Poor wiring layout
- Skipping testing phase
Start small and improve step by step.
Cost Breakdown of a Beginner Robot
- 3D printing material: $10–$30
- Arduino kit: $15–$30
- Motors and sensors: $20–$50
- Battery system: $10–$25
Total: $50–$120 for a beginner robot
Safety Tips
- Do not touch hot printer nozzle
- Avoid short circuits
- Use protected batteries
- Work in ventilated space
- Keep tools organized
Future of 3D Printed Robots
The future of robotics is extremely exciting:
- Fully 3D printed humanoid robots
- AI-powered home assistants
- Self-repairing robot systems
- Smart factory automation
Learning this skill now gives you a strong future advantage.
Learning Path for Beginners
Step 1: Learn basic CAD design
Step 2: Learn 3D printing basics
Step 3: Build simple robot car
Step 4: Learn Arduino programming
Step 5: Add sensors and upgrades
Step 6: Build advanced robots
Career Opportunities in Robotics
Learning robotics opens careers in:
- Robotics engineering
- AI development
- Automation industry
- Mechanical design
- IoT systems
Conclusion
Learning how to make a robot with 3d printer is one of the most valuable modern skills. It combines creativity, engineering, and programming into one powerful experience.
You start with simple designs, learn from mistakes, and gradually move toward advanced robotics systems. With affordable tools and open-source technology, building robots at home is now easier than ever.
The key is practice, patience, and curiosity. Every expert robot builder once started with a simple wheel robot.
FAQs
Is it hard to learn how to make a robot with a 3D printer?
No. Beginners can start with simple robots in a few days.
Do I need coding skills?
Basic coding helps, especially Arduino programming, but you can learn step by step.
What is the easiest robot to build first?
A small obstacle-avoiding wheeled robot is the best beginner project.
Can I build robots without engineering background?
Yes. Many hobbyists learn from scratch using online guides.
How long does it take to build a robot?
Simple robots can take 1–3 days. Advanced robots may take weeks.